🖥️ Migrating to Eleventy
2023 November 15You may have noticed that this site now loads a little faster. The reason is because I migrated all of my files from Zonelets to Eleventy! It is a static site generator (SSG) which means loading up my site no longer uses the Zonelets Javascript file for navigation, and also lets me set up templates to edit the entire site very quickly. If you are a total coding noob like me and were looking to get started in Eleventy, here is my step-by-step guide for what I did!
- Install everything
- Configure Eleventy
- Set up your top-level pages and base.njk
- Set up your posts directory and posts.njk
- Set up your RSS feed
- Set up your style.css
- Export your site
- Managing your site's tags
- Go forth and make cool sites
Install everything
Eleventy requires Node.js version 14 or higher, so go grab that first.
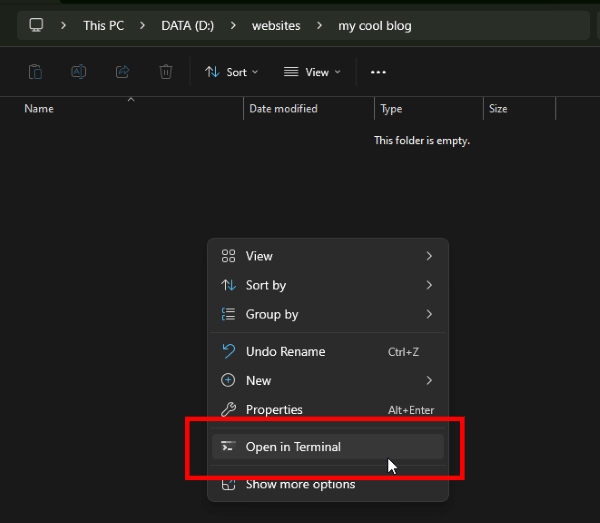
Next, make a directory that will house your website. For example, I made D:\websites\my cool blog. If you are on Windows like me, go into that folder, right-click, and select Open in Terminal.
Once that's open, type in:
npm init -ynpm install @11ty/eleventy --save-dev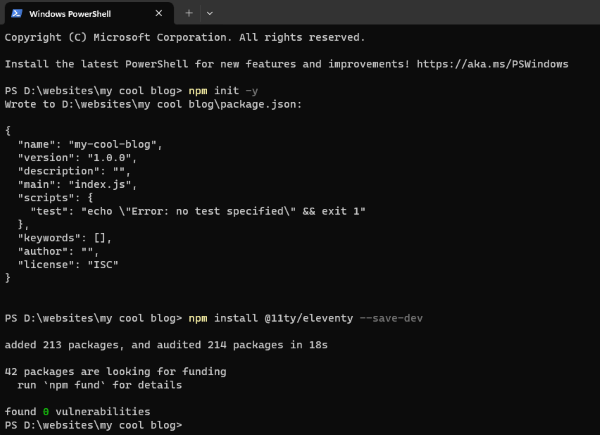
This will get Eleventy set up in your project folder.
While we're here, I want to install two add-ons we'll be using later. The first is Luxon, which will let us display our date and time. The second is the 11ty RSS plugin, which as you'd imagine, will let us make an RSS feed.
npm install luxon --save-devnpm install @11ty/eleventy-plugin-rss --save-devConfigure Eleventy
Create the .eleventy.js file
Go into your project directory and add a file named .eleventy.js and enter this in:
/my cool blog/.eleventy.js
// Tells Eleventy to look for Luxon
const { DateTime } = require('luxon');

// Tells Eleventy to look for the RSS plugin
const pluginRss = require("@11ty/eleventy-plugin-rss");

// This is all the stuff that Eleventy is going to process when it exports your site
module.exports = function (eleventyConfig) {
  // Edit these to include your images, CSS, and other folders and files that you want to copy over to your public folder.
  eleventyConfig.addPassthroughCopy("./src/styles");
  eleventyConfig.addWatchTarget("./src/styles/");
  eleventyConfig.addPassthroughCopy("./src/images");
  eleventyConfig.addWatchTarget("./src/images/");

  // Load the RSS plugin
  eleventyConfig.addPlugin(pluginRss);

  // Adds Next & Previous links to the bottom of our blog posts
  eleventyConfig.addCollection("posts", function(collection) {
    const coll = collection.getFilteredByTag("posts");
    for(let i = 0; i < coll.length ; i++) {
      const prevPost = coll[i-1];
      const nextPost = coll[i + 1];
      coll[i].data["prevPost"] = prevPost;
      coll[i].data["nextPost"] = nextPost;
    }
    return coll;
  });

  // Add the filter "readableDate" to simplify the way blog dates are presented in the Archives page
  eleventyConfig.addFilter('readableDate', (dateObj) => {
    return DateTime.fromJSDate(dateObj, { zone: 'utc+9' }).toFormat(
      'yyyy-LL-dd'
    );
  });

  // Add the filter "topDate" to simplify the way blog dates are presented at the top of blog posts
  eleventyConfig.addFilter('topDate', (dateObj) => {
    return DateTime.fromJSDate(dateObj, { zone: 'utc+9' }).toFormat(
      'yyyy LLLL dd'
    );
  });

  // These are the folders that Eleventy will use. "src" is where you edit files that Eleventy will then take in and export into "public," which you upload.
    return {
      dir: {
        input: "src",
        output: "public",
      },
    };
  };
It's kind of a lot, but we'll go over each part later in due time. For now, save this file.
Set up your src directory
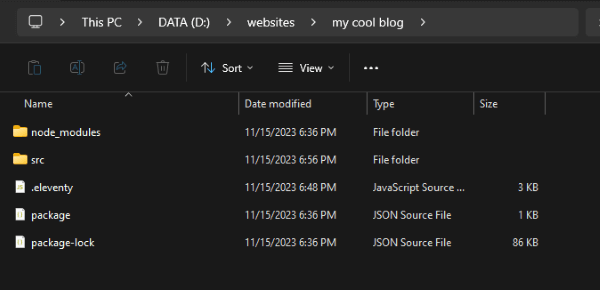
Next, make a directory in your project directory named /src. Right now, my project directory looks like this:
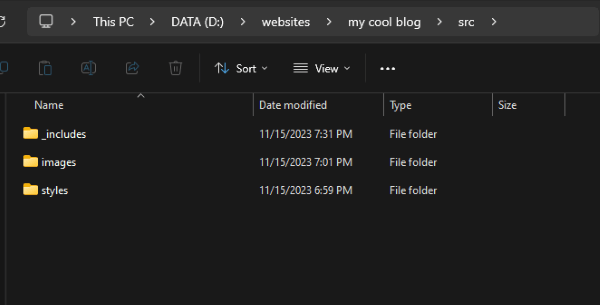
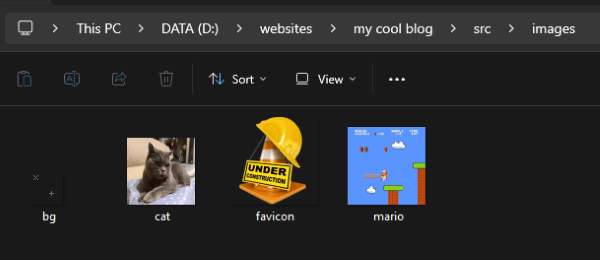
Open your /src directory and make a new folder named /_includes. This is where your templates are going to live. Also add your /images and /styles folders. I am going to add favicon.png, cat.jpg, mario.jpg, and bg.gif into /images for this guide.
Set up your top-level pages and base.njk
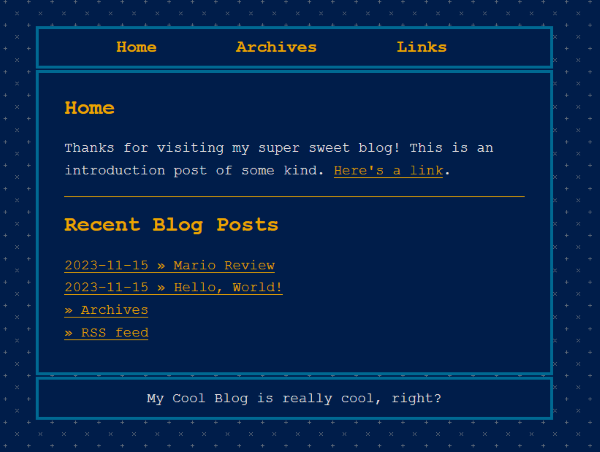
Create index.md
In your /src folder, make a file named index.md and enter this in:
/my cool blog/src/index.md
---
layout: base.njk
permalink: index.html
title: My Cool Blog
description: This blog is totally sweet, right?
featured_image: favicon.png
---
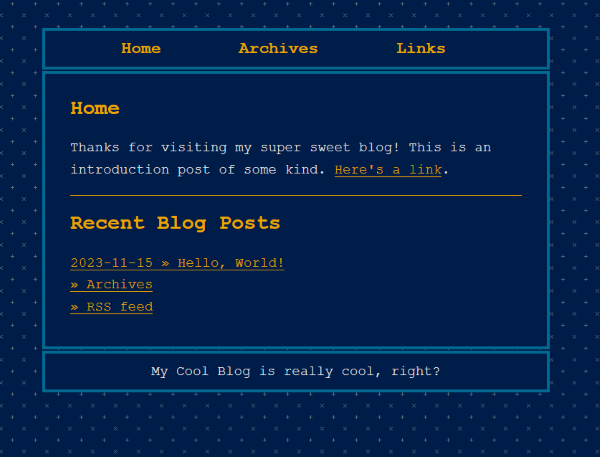
Thanks for visiting my super sweet blog! This is an introduction post of some kind.
[Here's a link in Markdown](https://time.is/).
<a href="https://time.is">You can also write it in HTML</a>.
---
<!-- This next part will show your top three most recent posts. You can change how readableDate looks in your .eleventy.js file-->
## Recent Blog Posts
<div id="recentpostlistdiv">
<ul>
{% assign top_posts = collections.posts | reverse %}
{%- for post in top_posts limit:3 -%}
<li><a href="{{ post.data.permalink }}">{{ post.data.date | readableDate }} » {{ post.data.title }}</a></li>
{% endfor %}<li class="moreposts"><a href="archives.html">» Archives</a></li><li class="moreposts"><a href="rss.xml">» RSS feed</a></li></ul>
</div>Let's go over what these different parts are.
Frontmatter
Everything between the top two --- lines is the frontmatter that Eleventy will use to populate variables in the future. You can set your files up any way you like. This is the system that I use for top-level pages:
- layout: This tells Eleventy to use the
base.njklayout to make this page. We'll go over thebase.njkin a bit. - permalink: You don't really need this, but I like to set what my files will export out to. In this case, to
./index.html. - title and description: Self-explanatory. You don't strictly need them, but I will use these fields to populate the page metadata later.
- featured_image: Again, this is mostly for page metadata purposes.
I also have two more frontmatter fields for our blog entries, date and tags, but we'll get to those later.
The content
You can write in Markdown or HTML or a mixture of both, as I have done. You'll also see that I have added a block for Recent Blog Posts which will:
- Grab everything tagged "posts" (as you will see later, ALL blog posts will by default be tagged "posts")
- Show them in reverse chronological order (i.e. most recent first)
- Limit this list to three items
Create base.njk
Next, we're going to create the template that your top-level pages will use. Go into your /_includes directory and create a new file named base.njk. Open it in your editor and throw this code in there:
/my cool blog/src/_includes/base.njk
---
title: "My Cool Blog: {{ title }}"
---
<!DOCTYPE html>
<html lang="en">
  <head>
    <title>My Cool Blog: {{ title }}</title>
    <link rel="icon" href="images/favicon.png" type="image/x-icon">
    <link href="https://yourwebsitehere.com/rss.xml" rel="alternate" type="application/rss+xml" title="RSS feed for My Cool Blog">
    <link href="styles/style.css" rel="stylesheet" type="text/css" media="all">
    <meta charset="UTF-8">
    <meta name="viewport" content="width=device-width, initial-scale=1.0">
    <meta name="description" content="This is the description for My Cool Blog!">
    <meta property="og:type" content="website">
    <meta property="og:title" content="{{ title }}">
    <meta property="og:url" content="https://yourwebsitehere.com/{{ permalink }}">
    <meta property="og:image" content="https://yourwebsitehere.com/images/{{ featured_image }}">
    <meta property="og:description" content="{{ description }}">
  </head>

  <body>
    <main id="container">

      <div id="headerArea">
        <!--If you wanted to put in a header image, this is where you would do it-->
        <nav id="navbar">
        <!--This is where you edit the navbar links at the top of the page-->
          <ul>
            <li><a href="index.html">Home</a></li>
            <li><a href="archives.html">Archives</a></li>
            <li><a href="links.html">Links</a></li>
          </ul>
        </nav>
      </div>

      <!--This is where the bulk of your page lives-->
      <div id="flex">
        <article>

          <h1>{{ title }}</h1>

          {{ content | safe }}

        </article>
      </div>

      <!--Edit in your footer here, or delete it entirely if you want-->
      <footer id="footer">My Cool Blog is really cool, right?</footer>

    </main>

    <!--this will add a 'Go to top' button on your site-->
    <button onclick="topFunction()" id="topBtn" title="Go to top">Top</button>

    <script>
      let topbutton = document.getElementById("topBtn");
      window.onscroll = function() {scrollFunction()};
      function scrollFunction() {
        if (document.body.scrollTop > 20 || document.documentElement.scrollTop > 20) {
          topbutton.style.display = "block";
        } else {
          topbutton.style.display = "none";
        }
      }
      function topFunction() {
        document.body.scrollTop = 0;
        document.documentElement.scrollTop = 0;
      }
    </script>
    <!--end top button code-->

  </body>
</html>
A lot of this should be pretty familiar if you're migrating your site over from Zonelets, or if you've already got a blog going. You'll also see where the template will pull the {{ title }}, {{ description }}, {{ featured_image }}, and so on from the frontmatter of the index.md file we made earlier.
Creating your other top-level pages
In the sample base.njk above, you'll see that the navbar also has links to archives.html and a links.html. So in your /src directory, let's make quick placeholders for them like so:
/my cool blog/src/archives.md
---
layout: base.njk
permalink: archives.html
title: Archives
description: These are where old posts go!
featured_image: favicon.png
---
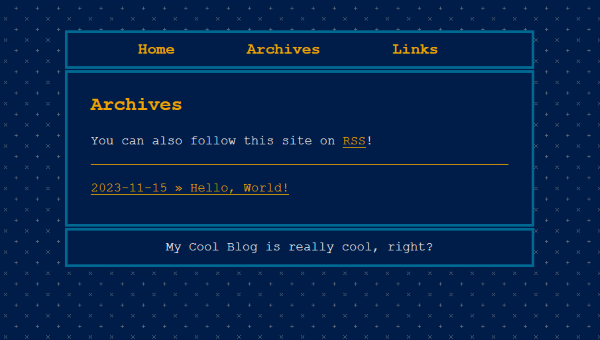
You can also follow this site on [RSS](rss.xml)!
---
<!--This next part shows all of your posts tagged "posts" in reverse chronological order-->
<ul class="none">
{% assign top_posts = collections.posts | reverse %}
{%- for post in top_posts -%}
<li><a href="{{ post.data.permalink }}">{{ post.data.date | readableDate }} » {{ post.data.title }}</a></li>
{% endfor %}
</ul>Just like with the Recent Blog Posts block from index.md, this page has a block that will bring up all posts tagged "posts" and display them in reverse chronological order. However, here they are not limited to three, and will list all of them.
/my cool blog/src/links.md
---
layout: base.njk
permalink: links.html
title: Links
description: More cool sites!
featured_image: favicon.png
---
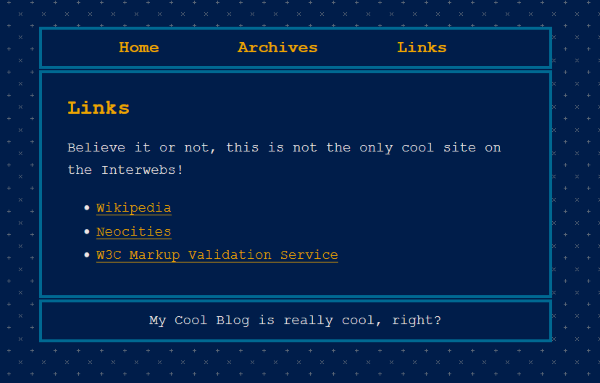
Believe it or not, this is not the only cool site on the Interwebs!
- [Wikipedia](https://www.wikipedia.org/)
- [Neocities](https://neocities.org)
- [W3C Markup Validation Service](https://validator.w3.org/)Obviously, you don't need to make a Links page, you can actually make this whatever you want. Just make sure to edit the navbar URL in the base.njk template so that it points to the right place.
Set up your posts directory and post.njk
Write your first blog post
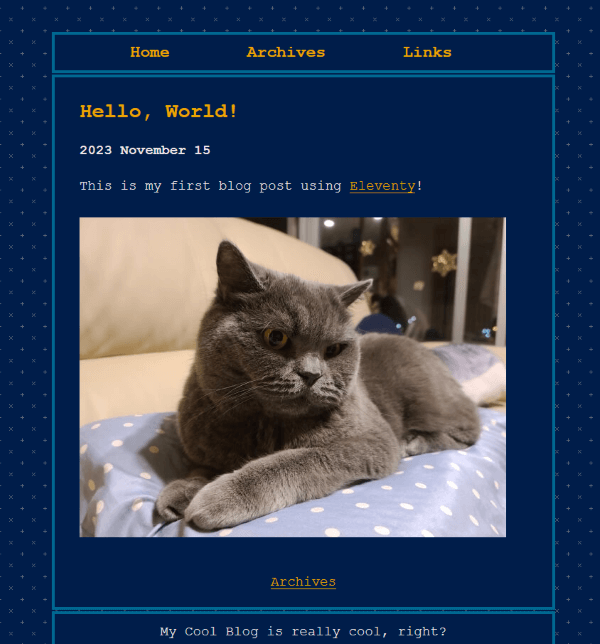
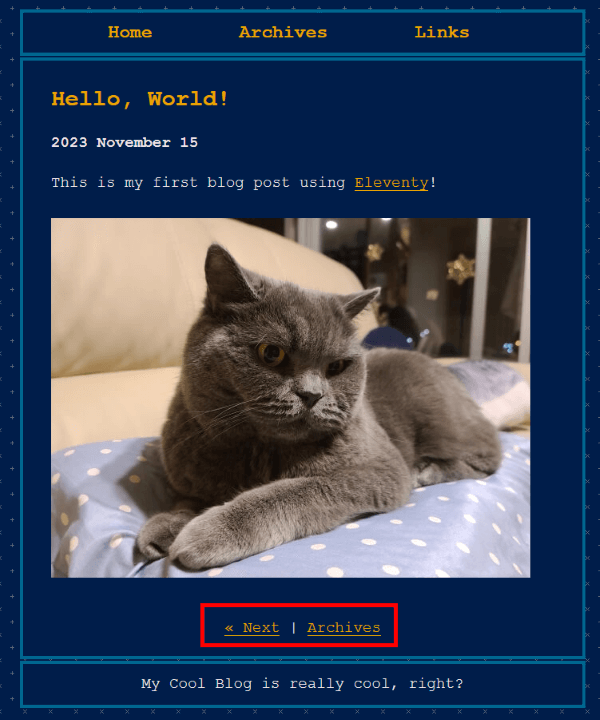
Back in your /src directory, create a new folder and name it /posts. Open that directory and create a new .md file. You can name it whatever you want, but I'm gonna call mine 2023-11-15-Hello-World.md. Open it in your editor and edit it with something like this:
/my cool blog/src/posts/2023-11-15-Hello-World.md
---
layout: post.njk
permalink: posts/2023-11-15-Hello-World.html
title: Hello, World!
date: 2023-11-15
description: This is the first post on my brand new cool blog!
featured_image: cat.jpg
tags:
- journal
---
This is my first blog post using [Eleventy](https://www.11ty.dev/)!
Some quick notes:
- Notice that the layout field in the frontmatter is now pointing to
post.njk. We'll be making that in a sec. - Also notice that I prefaced my permalink with
posts/which means that Eleventy will create a directory called "posts" and then make this file2023-11-15-Hello-World.htmlinside of that directory. - You can actually make the date whatever you want. This is handy for importing old posts or manually setting the date for your posts.
- You can add however many tags you want, and that will add this post to those collections. More on that later.
Create posts.json
Create a file named posts.json inside of your /posts folder. Open it in your editor and add this:
/my cool blog/src/posts/posts.json
{
  "layout": "post",
  "tags": "posts"
}
This tells Eleventy that every page that uses the post.njk layout should also be tagged "posts." Remember how the Recent Blog Posts section in index.md and the Full Archives section in archive.md was referring to collections.posts? That means it will pull everything using this "posts" tag, i.e. all your blog entries but not top-level pages.
Create post.njk
Open your /src/_includes/ directory and create a new file called post.njk. As you may have guessed, this will be your blog post template.
/my cool blog/src/_includes/post.njk
---
title: "My Cool Blog: {{ title }}"
---
<!DOCTYPE html>
<html lang="en">
  <head>
    <title>My Cool Blog: {{ title }}</title>
    <link rel="icon" href="../images/favicon.png" type="image/x-icon">
    <link href="https://yourwebsitehere.com/rss.xml" rel="alternate" type="application/rss+xml" title="RSS feed for My Cool Blog">
    <link href="../styles/style.css" rel="stylesheet" type="text/css" media="all">
    <meta charset="UTF-8">
    <meta name="viewport" content="width=device-width, initial-scale=1.0">
    <meta name="description" content="This is the description for My Cool Blog!">
    <meta property="og:type" content="article">
    <meta property="og:title" content="{{ title }}">
    <meta property="og:url" content="https://yourwebsitehere.com/{{ permalink }}">
    <meta property="og:image" content="https://yourwebsitehere.com/images/{{ featured_image }}">
    <meta property="og:description" content="{{ description }}">
  </head>

  <body>
    <main id="container">

      <div id="headerArea">
        <!--If you wanted to put in a header image, this is where you would do it-->
        <nav id="navbar">
        <!--This is where you edit the navbar links at the top of the page-->
          <ul>
            <li><a href="../index.html">Home</a></li>
            <li><a href="../archives.html">Archives</a></li>
            <li><a href="../links.html">Links</a></li>
          </ul>
        </nav>
      </div>

      <!--This is where the bulk of your page lives-->
      <div id="flex">
        <article>
          <h1>{{ title }}</h1>

          <!--You can change how topDate looks in your .eleventy.js file-->
          <strong>{{ date | topDate }}</strong>

          {{ content | safe }}

          <!--This will take you to the next/previous blog entries if they exist-->
          <nav id="nextprev">
          {% if nextPost.url %}
          <a class="next" href="{{ nextPost.url }}">« Next</a> |
          {% endif %}
          <a href="../blog.html">Archives</a>
          {% if prevPost.url %}
          | <a class="previous" href="{{ prevPost.url }}">Previous »</a>
          {% endif %}
          </nav>
        </article>
      </div>

      <!--Edit in your footer here, or delete it entirely if you want-->
      <footer id="footer">My Cool Blog is really cool, right?</footer>

    </main>

    <!--this will add a 'Go to top' button on your site-->
    <button onclick="topFunction()" id="topBtn" title="Go to top">Top</button>

    <script>
      let topbutton = document.getElementById("topBtn");
      window.onscroll = function() {scrollFunction()};
      function scrollFunction() {
        if (document.body.scrollTop > 20 || document.documentElement.scrollTop > 20) {
          topbutton.style.display = "block";
        } else {
          topbutton.style.display = "none";
        }
      }
      function topFunction() {
        document.body.scrollTop = 0;
        document.documentElement.scrollTop = 0;
      }
    </script>
    <!--end top button code-->

  </body>
</html>
Again, you can see where all of the {{ title }} and other frontmatter variables fit in here. You can also see the next/previous links at the bottom of the page.
Set up your RSS feed
Go back to your /src folder and create a new file named rss.njk. Edit it to look like:
/my cool blog/src/rss.njk
---json
{
  "permalink": "rss.xml",
  "eleventyExcludeFromCollections": true,
  "metadata": {
    "title": "My Cool Blog",
    "subtitle": "This is the description for My Cool Blog!",
    "url": "https://yourwebsitehere.com/",
    "feedUrl": "https://yourwebsitehere.com/rss.xml",
    "author": {
        "name": "Dennis the Menace"
        }
    }
}
---
<?xml version="1.0" encoding="utf-8"?>
<feed xmlns="http://www.w3.org/2005/Atom" xml:base="{{ metadata.url }}">
  <title>{{ metadata.title }}</title>
  <subtitle>{{ metadata.subtitle }}</subtitle>
  <link href="{{ permalink | absoluteUrl(metadata.url) }}" rel="self"/>
  <updated>{{ collections.posts | getNewestCollectionItemDate | dateToRfc3339 }}</updated>
  <id>{{ metadata.url }}</id>
  <author>
    <name>{{ metadata.author.name }}</name>
  </author>
  {%- for post in collections.posts | reverse %}
  {%- set absolutePostUrl = post.url | absoluteUrl(metadata.url) %}
  <entry>
    <title>{{ post.data.title }}</title>
    <link href="{{ absolutePostUrl }}"/>
    <updated>{{ post.date | dateToRfc3339 }}</updated>
    <id>{{ absolutePostUrl }}</id>
    <content xml:lang="{{ metadata.language }}" type="html"><![CDATA[<img src="https://yourwebsitehere.com/images/{{ post.data.featured_image }}">]]>{{ post.data.description }}</content>
  </entry>
  {%- endfor %}
</feed>
Again, you can see where all the {{ featured_image }} and {{ description }} all get automated here.
Set up your style.css
In your /src/styles/ directory, create style.css if you don't already have one. Editing your site's CSS and layout is beyond the scope of this tutorial, so for now, here is a quick sample CSS that I made for Daikon's blog, and is based off the one that comes with Zonelets:
/my cool blog/src/styles/style.css
body {
  background-color: #001D4A;
  background-image: url("../images/bg.gif");
  font-size: 1.2em;
  font-family: "Courier New", sans-serif;
  margin: 0;
  color: #EEE5E5;
  line-height: 1.6em;
}

a, a:visited {
  color: #ECA400;
  text-decoration: underline;
}
a:hover {
  text-decoration: underline;
  background-color: #006992;
}

* {
  box-sizing: border-box;
}

#container {
  max-width: 700px;
  margin: 3em auto;
  width: 90%;
}

#navbar {
  background-color: #001D4A;
  width: 100%;
  padding: 0 5%;
  font-weight: bold;
  margin-bottom: 10px;
  outline-width: 4px;
  outline-style: solid;
  outline-color: #006992;
}
#navbar ul {
  display: flex;
  padding: 0;
  margin: 0;
  list-style-type: none;
  justify-content: space-evenly;
}
#navbar li {
  padding-top: 5px;
  padding-bottom: 5px;
  font-size: 1.2em;
  display: inline-block;
  margin-right: 1.5em;
  margin-bottom: 0.2em;
  margin-top: 0.2em;
}
#navbar li a, #navbar li a:visited {
  color: #ECA400;
  text-decoration: none;
  padding: 3px;
}
#navbar li a:hover {
  background-color: #006992;
  color: #ECA400;
  text-decoration: none;
}

#flex {
  display: flex;
}

article {
  padding: 10px 5% 20px 5%;
  background-color: #001D4A;
  outline-style: none;
  margin-bottom: 10px;
  width: 100%;
  outline-width: 4px;
  outline-style: solid;
  outline-color: #006992;
}

footer {
  background-color: #001D4A;
  width: 100%;
  padding: 10px;
  text-align: center;
  outline-style: none;
  outline-width: 4px;
  outline-style: solid;
  outline-color: #006992;
}

h1, h2, h3, h4 {
  color: #ECA400;
}

hr {
  border: solid #ECA400;
  border-width: 1px 0 0 0;
}

blockquote {
  padding: 0 20px;  margin-left: 0;  border-left: 2px dotted #006992;
  font-size: 1.1em;
  line-height: 1.6em;
}

img {
  max-width: 100%;
  height: auto;
  margin-top: 0.5em;
  margin-bottom: 0.5em;
}

ul.none {
    padding: 0;
    list-style-type: none;
}

/* Alignment classes */
.right {
  float: right;
  margin-left: 1em;
}
.left {
  float: left;
  margin-right: 1em;
}
.center {
  display: block;
  margin-right: auto;
  margin-left: auto;
  text-align: center;
}

/* Recent Blog Posts block in index.html */
#recentpostlistdiv ul {
  padding: 0;
  list-style-type: none;
}

/* At the bottom of blog posts */
#nextprev {
  text-align: center;
  margin-top: 1.4em;
}

@media only screen and (max-width: 900px) {
  #flex {
    flex-wrap: wrap;
  }
  #navbar ul {
    flex-wrap: wrap;
  }
}

/* Go To Top button */
#topBtn {
  display: none;
  position: fixed;
  bottom: 20px;
  right: 30px;
  z-index: 99;
  border: none;
  outline-width: 4px;
  outline-style: solid;
  outline-color: #006992;
  background-color: #001D4A;
  color: #ECA400;
  cursor: pointer;
  padding: 15px;
  font-size: 18px;
  font-family: "Courier New", sans-serif;
}
#topBtn:hover {
  color: #ECA400;
  background-color: #006992;
}
Export your site
IT'S TIME!! Go to your project root folder, right-click, and select Open in Terminal again. Then type in:
npx @11ty/eleventy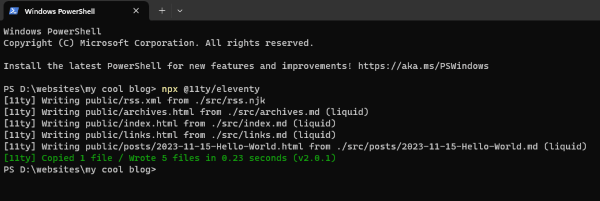
You should now have a /public directory inside of your project folder. Open that up, and voila! It's your site, complete with RSS feed!
/my cool blog/public/index.html
/my cool blog/public/posts/2023-11-15-Hello-World.html
/my cool blog/public/archives.html
/my cool blog/public/posts/links.html
/my cool blog/public/rss.xml
Managing your site's tags
Earlier, we created our Hello World post tagged "journal." We can categorize our pages using tags, which Eleventy will then add to a collection. Then, we can display those collections. Right now, we are using the "posts" collection for our pagination (the next/previous links at the bottom, as well as the Recent Blog Posts block on the index). Let's make topic-specific sections on our Archives page.
Adding new posts
Make another blog entry in your /src/posts/ directory and tag it something like "video-games."
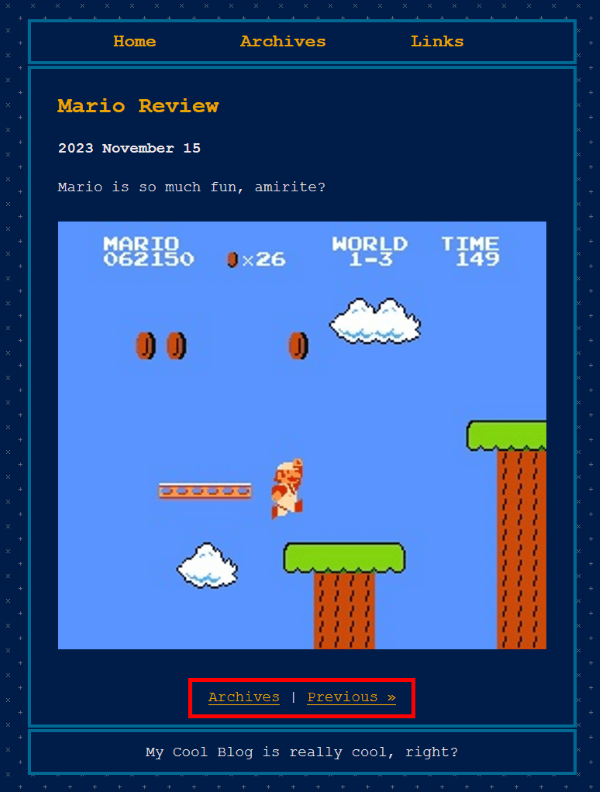
/my cool blog/src/posts/2023-11-15-Mario-Review.md
---
layout: post.njk
permalink: posts/2023-11-15-Mario-Review.html
title: Mario Review
date: 2023-11-15
description: This is a blog review for that cool Mario video game!
featured_image: mario.jpg
tags:
- video-games
---
Mario is so much fun, amirite?
Edit archives.md with your collections
Open up /src/archives.md. If you'll recall, it looked like this:
/my cool blog/src/archives.md
---
layout: base.njk
permalink: archives.html
title: Archives
description: These are where old posts go!
featured_image: layout/favicon.png
---
You can also follow this site on [RSS](rss.xml)!
---
<!--This next part shows all of your posts tagged "posts" in reverse chronological order-->
<ul class="none">
{% assign top_posts = collections.posts | reverse %}
{%- for post in top_posts -%}
<li><a href="{{ post.data.permalink }}">{{ post.data.date | readableDate }} » {{ post.data.title }}</a></li>
{% endfor %}
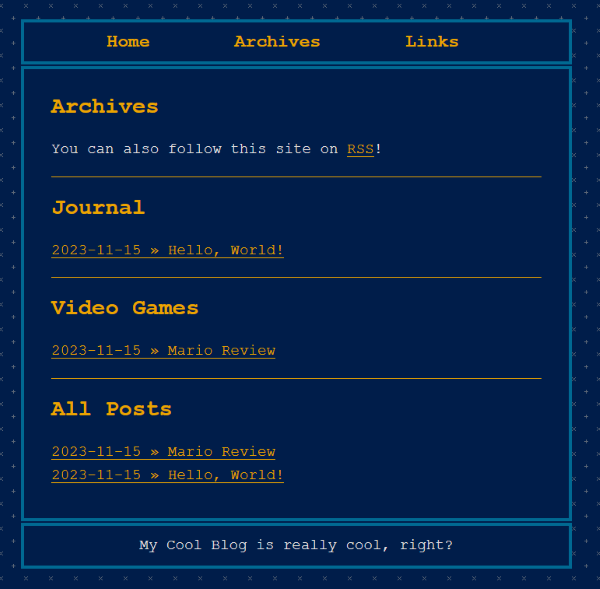
</ul>Let's say we want to break this page up into your posts tagged "journal" and "video-games," and then have something like "all posts" at the bottom. We can do something like this:
/my cool blog/src/archives.md
---
layout: base.njk
permalink: archives.html
title: Archives
description: These are where old posts go!
featured_image: layout/favicon.png
---
You can also follow this site on [RSS](rss.xml)!

---

## Journal

<!--This next part shows all of your posts tagged "journal" in reverse chronological order-->

<ul class="none">
{% assign top_journal = collections.journal | reverse %}
{%- for post in top_journal -%}
  <li><a href="{{ post.data.permalink }}">{{ post.data.date | readableDate }} » {{ post.data.title }}</a></li>
{% endfor %}
</ul>

---

## Video Games

<!--This next part shows all of your posts tagged "video-games" in reverse chronological order-->

<ul class="none">
{% assign top_video-games = collections.video-games | reverse %}
{%- for post in top_video-games -%}
  <li><a href="{{ post.data.permalink }}">{{ post.data.date | readableDate }} » {{ post.data.title }}</a></li>
{% endfor %}
</ul>

---

## All Posts

<!--This next part shows all of your posts tagged "posts" in reverse chronological order-->

<ul class="none">
{% assign top_posts = collections.posts | reverse %}
{%- for post in top_posts -%}
  <li><a href="{{ post.data.permalink }}">{{ post.data.date | readableDate }} » {{ post.data.title }}</a></li>
{% endfor %}
</ul>
Now run npx @11ty/eleventy again to export your site. Your Archives page should now look like:
/my cool blog/public/archives.html
You can also see that your posts have been automatically updated with next/previous links, and the Recent Blog Posts in your index.html and RSS have also been updated with your new post:
/my cool blog/public/posts/2023-11-15-Mario-Review.html
/my cool blog/public/posts/2023-11-15-Hello-World.html
/my cool blog/public/index.html
/my cool blog/public/rss.xml

Go forth and make cool sites
This has been only a sample of cool stuff you can do with Eleventy! If you haven't yet, I highly recommend checking out the documentation, as well as seeing what other people have been doing. I just wanted to show you how you can automate some of the process of running a Zonelets blog while still maintaining that scrappy sense of Web 1.0 DIY coding. If you make something cool, please tell me about it and I'll add your site to my links section!